


How Much Does an Injection Mold Actually Cost? (And What Drives the Price)
Injection mold pricing is one of the most confusing parts of bringing a plastic product to market. Quotes can swing from a few thousand dollars to well over six figures for parts that look almost identical on paper. This guide breaks down what you’re actually paying for, what moves the number up or down, and how to think about mold cost as an investment rather than a line item.
First, a Quick Reality Check on Price Ranges
Before we get into the details, here’s a rough sense of what injection molds tend to cost in the U.S. today. Treat these as ballparks, not quotes. Your project could land anywhere inside or outside these ranges depending on the factors we’ll cover below.
- Simple, low-volume aluminum molds: roughly $6,000 to $15,000
- Mid-complexity steel production molds: roughly $10,000 to $50,000
- Complex, multi-cavity, high-volume steel molds: roughly $50,000 to $150,000+
- Highly specialized molds (medical, tight tolerances, overmolding, hot runners, large-shot presses): $100,000 to $500,000+
Every project is different. The only number that actually matters is the one on a real quote from a shop that has reviewed your CAD file.
Why the Mold Is Usually the Biggest Line Item
A mold is a custom-built, precision-machined piece of tooling that your parts come out of, sometimes millions of times. Unlike the part itself, which is mostly just plastic and machine time, the mold carries all the engineering, machining, hardening, and fitting work up front.
That’s why two quotes for the same part can look so different. One shop might be pricing a basic aluminum tool for 10,000 parts. Another might be pricing a hardened steel tool built to run a million shots without touch-up. Same part. Very different tools.
The 7 Biggest Factors That Drive Mold Cost
1. Part Size and Shot Weight
Bigger parts need bigger molds, bigger presses, and more raw material in the tool itself. A small snap-fit clip and a large enclosure panel aren’t in the same universe cost-wise, even if both are “just plastic.”
Shot weight (how much plastic gets injected per cycle) also determines which press your mold has to run on. Bigger presses cost more per hour, which affects your per-part price down the line.
2. Part Complexity and Geometry
Complexity is where costs quietly balloon. A few things that add real money to a mold:
- Undercuts that require side-actions, lifters, or collapsible cores
- Threads molded directly into the part
- Thin walls that demand careful flow analysis and gating
- Tight tolerances on mating surfaces or critical dimensions
- Complex parting lines that don’t split cleanly along a flat plane
A part that can be designed with straight pulls, uniform wall thickness, and generous draft angles will almost always be cheaper to tool than a clever part full of features that fight the molding process.
3. Number of Cavities
A single-cavity mold makes one part per cycle. A multi-cavity mold makes two, four, eight, or more parts per cycle. More cavities means more machining and a bigger, more complex tool, but it also means lower per-part cost once you’re in production.
For low volumes, single-cavity is almost always right. For high volumes, paying more up front for a multi-cavity tool usually pays for itself quickly in reduced cycle time and labor cost per part.
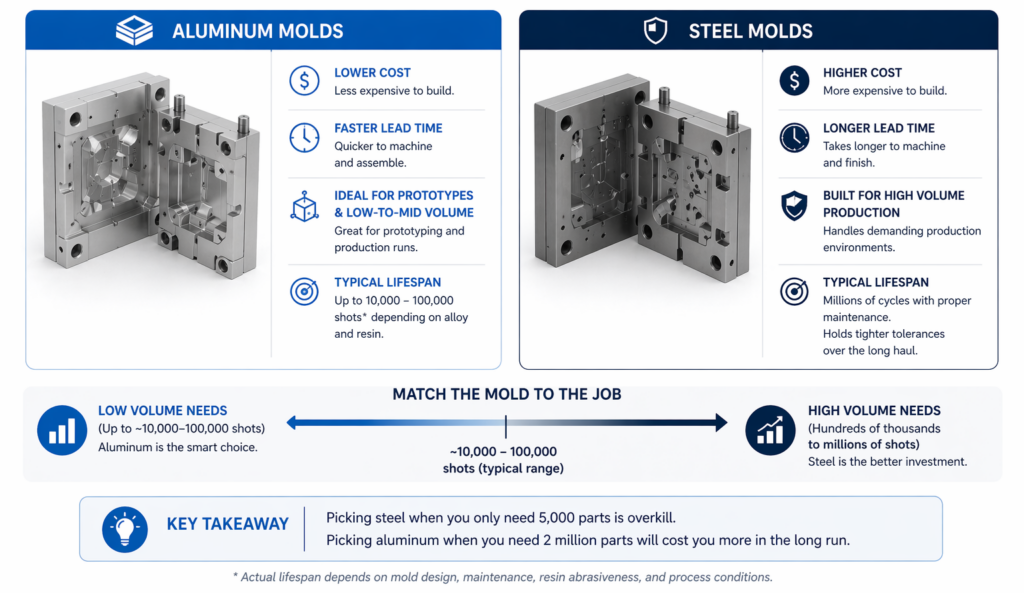
4. Mold Material: Aluminum vs. Steel
This is one of the biggest cost drivers, and it’s almost always a volume question.
- Aluminum molds are cheaper, faster to machine, and great for prototyping and low-to-mid volume runs (often up to 10,000 to 100,000 shots depending on the alloy and the resin).
- Hardened steel molds (P20, H13, S7, stainless grades) cost more and take longer to build, but they can run millions of cycles and hold tighter tolerances over the long haul.
Picking steel when you only need 5,000 parts is overkill. Picking aluminum when you need 2 million parts will cost you more in the long run.
5. Surface Finish and Texture
A glass-smooth SPI A-1 finish (the kind you see on clear cosmetic parts) takes hours of hand polishing. A matte textured finish requires a separate texturing process after machining. Even a basic machined finish has a range of quality levels.
If your part is a structural component hidden inside a housing, you probably don’t need a cosmetic finish. If it’s the face of a consumer product sitting on a store shelf, you do. That choice alone can swing tooling cost by thousands.
6. Runner System: Cold Runner vs. Hot Runner
A cold runner system is simpler and cheaper to build. Excess plastic in the runners gets trimmed and either recycled or scrapped.
A hot runner system keeps the plastic molten right up to the part, which reduces waste, speeds up cycle time, and improves part quality, especially on large or multi-cavity tools. Hot runners add significant cost up front (often $5,000 to $20,000+ depending on the system) but can pay back quickly on high-volume jobs.
7. Material Being Molded
The resin you’re running affects the mold too. Glass-filled nylons, PEEK, and other abrasive or corrosive materials eat through softer tool steels over time, so they usually require harder steel or special coatings. Medical and food-grade projects often require stainless steel and specific certifications, which add both material and documentation costs.
The Hidden Cost Most Buyers Forget: Design for Manufacturability
Here’s the one that catches people off guard. The design of the part itself is often the single biggest lever on mold cost, and it’s almost always decided before a molder ever sees the file.
A part designed without injection molding in mind can easily cost 20% to 40% more to tool than the same part with small design tweaks: adding draft, evening out wall thickness, removing unnecessary undercuts, or rethinking a feature that forces a side-action.
The cheapest change is the one you make in CAD. The most expensive one is the change you make after the mold is already cut.
This is why working with a vertically integrated shop that handles design, engineering, and tooling under one roof almost always saves money. Problems get caught in the design review, not on the shop floor.
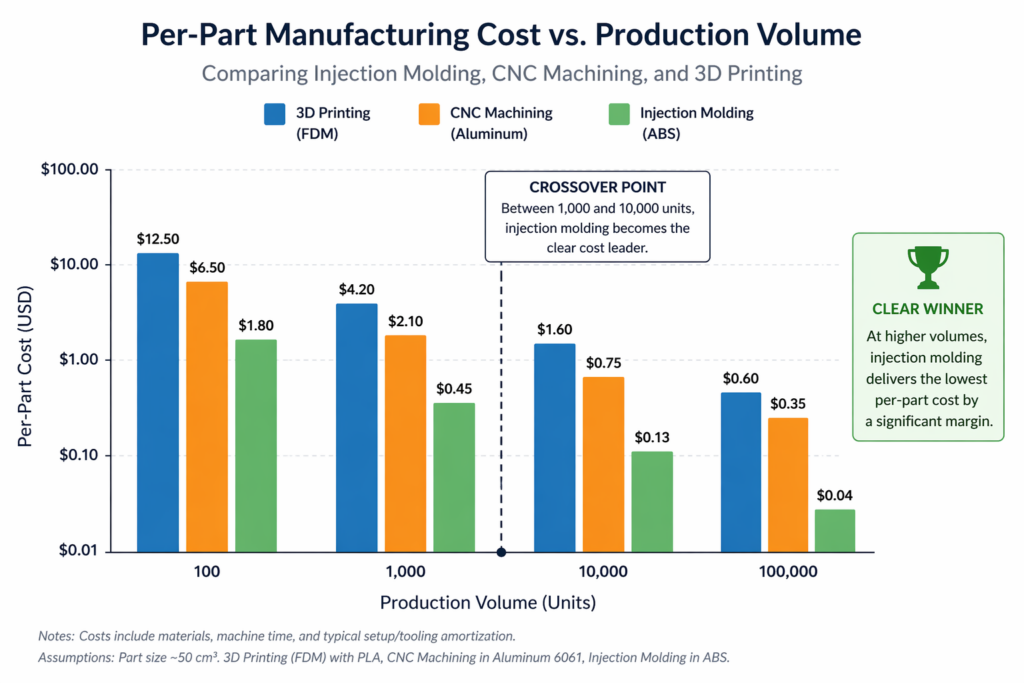
How to Think About Mold Cost as an Investment
It’s tempting to look at a mold quote in isolation and flinch. A $40,000 tool feels like a lot of money until you do the math on what it produces.
A straightforward way to frame it:
- Compare that total to what you’d pay for the same part made by other methods (CNC machining, 3D printing, urethane casting).
- Amortize the mold cost across the parts you expect to produce.
- Add the per-part molding cost (material, cycle time, labor, overhead).
On a 50,000-part run, a $40,000 mold adds $0.80 per part to tooling cost. If the molded part cost is $1.20, your all-in is $2.00. That same part CNC-machined might be $18. The mold pays for itself many times over.
The Bottom Line
Mold cost isn’t arbitrary, and it isn’t negotiable in the way people sometimes hope. It’s a reflection of size, complexity, material, volume, and finish, all mapped against what your part actually needs to do.
The best way to keep mold costs in check isn’t to shop for the cheapest quote. It’s to design the part with manufacturing in mind from day one, pick the right tool for your real volume, and work with a molder who will tell you when you’re overspecifying.
Ready to get a real number on your project?
BeraTek’s team reviews every quote with design, tooling, and production under one roof, so you get a price that reflects what your part actually needs, not a worst-case guess. Request a quote or contact us to talk through your project.